2.2 Tab Planning
This tab enables you to carry out various scheduling processes for the respectively selected event in the plan, as for example set the start time of an event or resolve conflicts.
Notice:
Most of these functions can also be done in the right-mouse options.
In this tab you can press the following buttons:
Icon | Label | Description |
|---|---|---|
| Save | Saves the current program plan. Please make sure to save your broadcasting plan regularly. Notice: Planner message on saving the plan Do you want to save your changes?: This message appears whenever there are unsaved changes in the background of the broadcast plan. Here it makes sense to firstly call the function Track changes
|
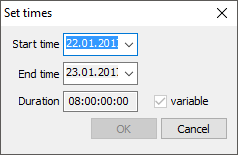
| Fix start time | If you wish to define the start or end time of an event, thus setting it fix, you can do this with this button or the right-mouse option Set start time. Select this option to modify the time frame-precise. Depending on your changes the start or end time will change, if the other time is fix. Click OK to save the new time of the event, and to fix it in the plan. Notice: Changing the start or end times could lead to overlaps or remaining times.
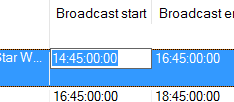
In addition to this, you can modify the start time of an event directly in the column Broadcast start. Click into the field to mark the time and make the changes.
You can not move an event more than 6 hours. Please use the dialog Edit Event for this. Please regard the scheduling behavior at broadcast day borders: In case you wish to move an event UPWARDS before the start of the broadcast day you cannot do this directly (the event would be moved DOWNWARDS within the same broadcast day automatically). Please set start times in the event dialog. Here you can also set the time to +/- one hour before or after the broadcast day start or end. |
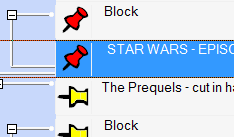
| Unfix start time | This button allows you to unfix or fix a selected event in the plan. By unfixing an event it automatically moves upwards to the end of the next previous event. Remaining times will be moved downwards. You can either fix/unfix an event with this option in the menu or in the right-mouse dialog, or by setting/removing the flag in the plan. |
| Unfix all sub-events | You can also chose the option Unfix start time for all sub-events. In this case the entire block will be unfixed and moves upwards to the end of the next previous event. |
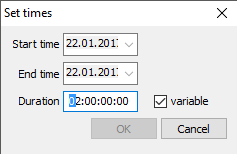
| Set duration | You can also set the duration of an event. This can be done for all events with a variable duration or with a duration that can be changed per default.
|
| Adapt length for gaps | With the help of this function all remaining times that still exist between the position of the selected event until the next fix event will be added up to extend or shorten the event duration of the selected event by this remaining time. |
| Correct event length | In case a scheduled event displays a length error - which can be seen in the column Status of the broadcast plan after activating the respective error in the header Tests and coloring all errors in the color options - you may correct the length of the event in the menu of the right mouse. This option is available in the following cases:
|
| Resolve conflict by shortening | If overlappings are produced during the scheduling process they are displayed as time errors in the plan (Error (Time) in the column Status of the plan).
Notice: To visualize errors right away during the scheduling process please activate the option Show all errors or the respective errors you wish to see in the header Tests of the Planner. The errors should be highlighted by a certain color. The color can be changed in Admin > Options > Color. Under the precondition that in the range of the time error is at least one element with a variable length (e. g. a design element or a count-down-board) you may resolve the error automatically by selecting the option Resolve conflict by shortening. Select this option for a variable element and enter the duration that is necessary to resolve the overlap. The time error will be resolved. |
| Resolve conflict by lengthening | If overlappings are produced during the scheduling process they are displayed as time errors in the plan (Error (Time) in the column Status of the plan). Notice: To visualize errors right away during the scheduling process please activate the option Show all errors or the respective errors you wish to see in the header Tests of the Planner. The errors should be highlighted by a certain color. The color can be changed in Admin > Options > Color. If you cannot fill a remaining time you have the possibility to elongate a variable element with the option Resolve conflict by lengthening. The length of the element will be changed automatically to the necessary length. |
| Recalc Secondary Events | This function enables you to recalculate the secondary events in your broadcast plan: In case some events were rescheduled you can simply select this option to recalculate the correct position/time of the secondary events. |
| Ad break index number | Opens the ad break index number menu, which is described in the following three entries. |
| Assign new index numbers to all ad breaks | See 2.1 Assign Ad Break Index Numbers. |
| Assign missing index numbers | Just like the button Assign new index numbers to all ad breaks. But please select this button, if you have added ad breaks additionally. In this case the index numbers will be generated only for the new ad breaks. |
| Check ad break index numbers for duplicates | At each coding process it makes sense to check the slot template for duplicates. A duplicate is generated if there are two identical combinations of the coding positions 1 & 2, 3 & 4 and 7 & 8 within one GFK day (03.00 to 03.00). Example: 01 14 12 01 and 01 14 17 01 = Dupliate coding Select the option Check ad break index numbers for duplicates in the header. |
| Flags | You can set various flags for the selected events in the broadcast plan. A once-click on the flag activates the flag. You may set the following flags for events:
Notice: Flags can also be set or removed per multiple selection:
Option in the menu: The flag of all events is set if none is set, the flag of all events is removed in case all are set. ALL flags are set in case only some of the selected events carry the flag. |
| Insert ad break | Ad breaks can be inserted manually into slots and programs in the Planner. The dialog Edit ad break appears. |
| Remove all ad breaks | This function removes all ad breaks in the current broadcast plan. |
| Join two segments | Joins two split events into one. Please select both halves of the event by selecting them with held [CTRL] key. Ad breaks between both halves will be removed. |
| Split segment in two | Splits the selected event into two segments. |
| Insert EPG event for gap | This is a customer-specific function for long remaining times of a day or more: Here you may schedule and save certain design elements to the database which inform about the following program. |
| Add logos | This option adds a logo to the selected element in the broadcast plan which is indicated by an activated flag Logo. You may set logos for program versions, trailers, design elements and ad sales. To remove the logo you just need to deactivate the flag Logo in the broadcast plan or in the event dialog. |
| Show scheduling status | For every event in the Programmer, you can see the scheduling status. In order to do this, please select an event and click this button or the option Show scheduling status in the the context menu of the right mouse. The Programmer shows the scheduling status of the event in the tab Scheduling status of the data sources. |