1.3.1 Setting the View of the Broadcast Plan
You have the option to adjust the broadcast plan window in such a way that you always have all relevant data at your disposal at one glance. Further options can be found in Admin > Options > Broadcast date.
Displaying and Hiding Columns
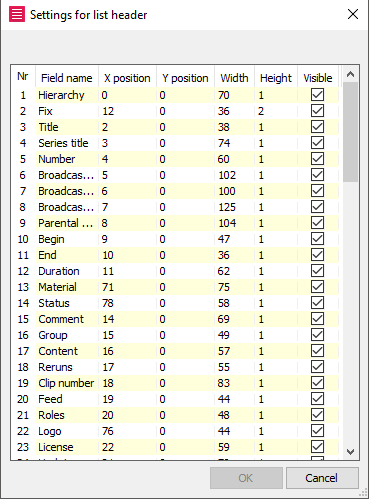
Make a click on any column head with the right mouse and select the option Edit header setup. In the dialog Settings for list header you may define which of the columns are displayed in your broadcast window view by activating or deactivating the flag Visible.
Moving Columns to the Right or Left within the Broadcast Plan
It makes sense to arrange all columns that you need in your daily work next to each other starting from the left side. Thus you avoid a scrolling within the plan. To do so please move the respective columns to the desired position while pressing the left mouse (Position is shown by red arrows).
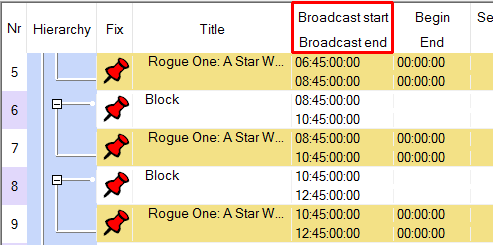
Arranging Double-Spaced Lines
The columns in you broadcast plan window can be arranged one below the other thus creating double-spaced lines. To do so you need to scale down two columns heads with the mouse by pulling them upwards. Then drag one of the reduced column heads below the other while pressing the left mouse button.
Broadcast Plan Borders
Each broadcast planner can make a basic setting of the broadcast plan borders. There are two options:
- On choosing the broadcast day (e. g. from 05.00 AM to 05.00 PM of the following day) the last block or slot which extends into this time will be displayed, too.
- On choosing the broadcast day (e. g. from 05.00 AM to 05.00 PM of the following day) ALL elements will be displayed up to the next fixation before and after this time border. For example, if the last fix element is scheduled the day before at 12.00 AM, this and all following element will be displayed in addition to the actual broadcast day.
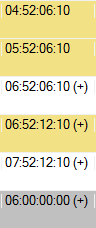
Independent of the chosen settings, all elements of the broadcast plan that lie outside of the defined broadcast plan borders, are displayed in read-only mode. In addition these elements carry a minus or plus sign (before and after broadcast day start and end) behind the broadcast start.
Notice:
Use the event dialog to set the start to +/- 1 hour before broadcast day start or end. You will get a warning message is an event is moved more than 6 hours. By this means you can prevent that an event at the broadcast day border is displaced unintentionally to the end of the actual plan and not upwards as desired to the broadcast day border.
Notice:
If you want to edit the element that lies on the broadcast day border please open the following or previous broadcast day - here you can edit the element.
Coloring the Broadcast Plan
To arrange your broadcast plan more clearly you can use the coloration of lines. To color e. g. according to remaining times, errors and program events, open Admin > Options > Color. Here you can chose the colors of the various Planner elements. By clicking on OK, your settings will be saved and remain the same even after closing the Planner. In this dialog you can also set the font size.