10 Workflows
The ContentExplorer allows you to reproduce your technical operating processes and workflows and to handle them with the help of various workflow tools. Thus you can execute your tasks and operating cycles regarding any content (e.g. trailer, contracts, programs, materials) in the CE via workflows that you can model and define according to your needs. This way you can structure your daily work chronologically in compliance with your processes and priorities.
For this the ContentExplorer disposes of a workflow editing wizard and a workflow definition assistant.
Working with workflows normally follows the following course:
- The workflow has to be defined via the workflow definition assistant. Here the individual steps - status and references, content, parameters, liable persons and actions are defined.
- Afterwards the individual process steps are linked with the status.
- After completing the workflow it can be started and run for the linked content.
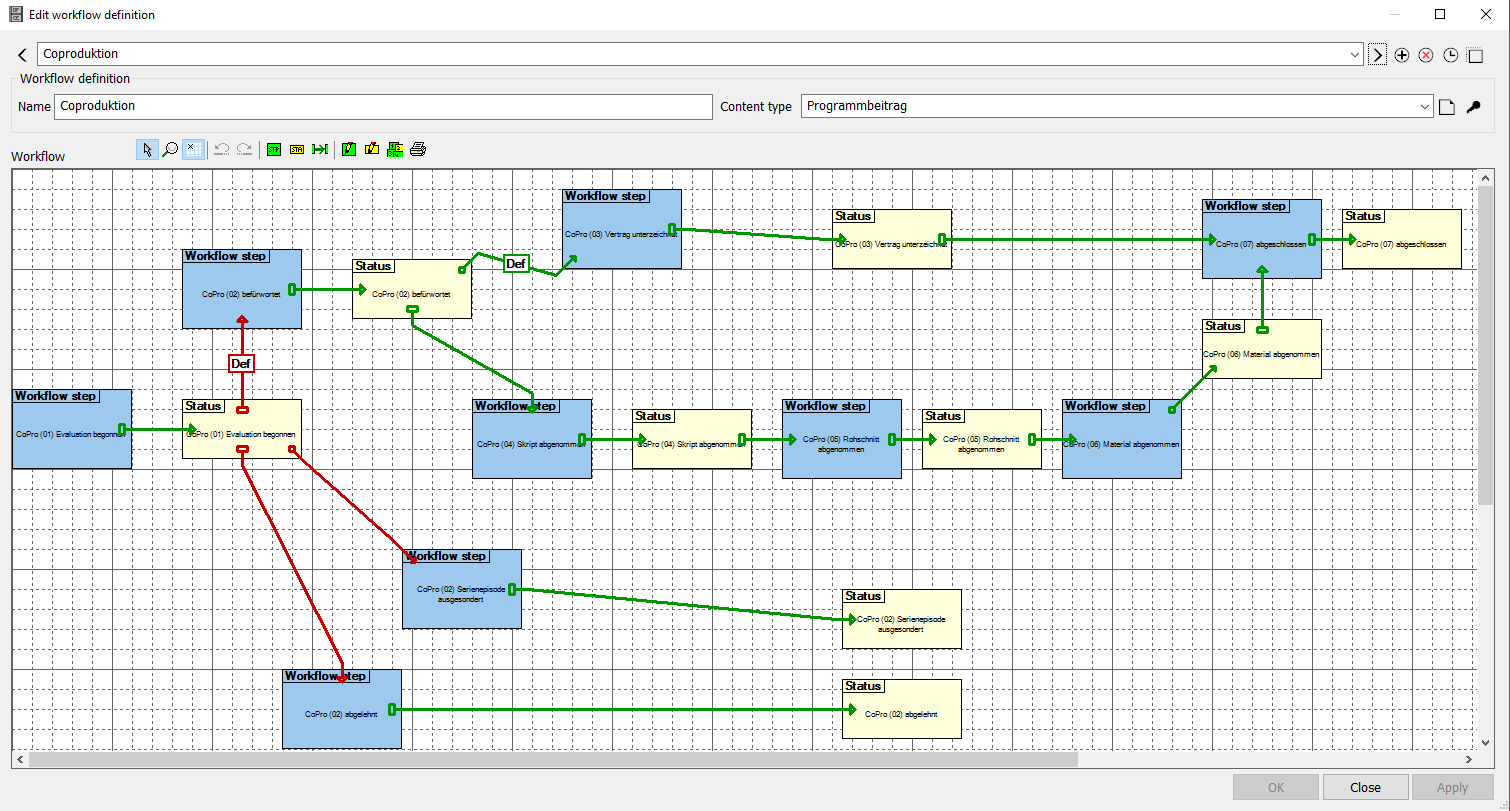
Workflow Editing Wizard for Defining Workflows
To define your workflows you may use the workflow editing wizard in the CE. This tool serves to model and display your workflows graphically with all workflow steps, status and links. You can also assign content and save the workflow. Once defined, you can employ all workflows for your tasks.
Notice:
If required CreateCtrl can conduct your most important workflow definitions for you. Please contact the CreateCtrl Support (support@createctrl.com).
In order to open the workflow definition wizard please select the option Workflow > Process definition in the header:

Information in Advance
A workflow is divided in individual workflow steps and status that are linked with each other. Within one workflow step you can
- create references for example for content: Programs, series, contracts, licenses, material, trailer, assets or a reference to parameters such as texts.
- define the liable persons for a workflow step.
- integrate a deadline calculation.
- create a reference to the MyPage of other users.
- create a reference to your own Mypage and a notification function.
Creating a New Workflow Step or Status
You can create a new workflow by building workflow steps and status and connecting them:
Fields
| Workflow definition | Name | Content type |
|---|
Content type
Assign content to the new workflow. If no content is assigned (Select no determination made) the workflow can be launched for all kinds of contents.
Buttons
| Icon | Mouse-Over | Description |
|---|---|---|
| Edit description | With this button you can add a description to the workflow. |
| Determine edit rights | With this button you can determine the edit rights. |
| Enable select mode | This button enables the select mode. |
| Enable zoom mode | This button enables the zoom mode. You can zoom in with the left mouse button and zoom out with the right mouse button. |
| Align with grid | This button activates the alignment to the grid. |
| Insert new workflow step | Please use the mouse to drag and position the new steps within the graphical grid. |
| Insert new status | Please use the mouse to drag and position the new status within the graphical grid. |
| Insert new link | To create a workflow chain out of the individual steps and statuses you can link them by using this button (see Linking Workflow Steps and Status). |
| Open workflow step editing dialog | This button opens the dialog Edit workflow step definition. You can also open this dialog by double-clicking a process step. |
| Open status edit dialog | This button opens the dialog Edit status definition. You can also open this dialog by double-clicking a status. |
| Set order of elements | With this button you can determine the order of the process elements. By defining the sequence of the individual workflow steps it is possible to influence the order of columns in the list view of the ContentExplorer detail area. |
| Prints workflow | With this button you can print the process. |


Dialog Edit Workflow Step Definition
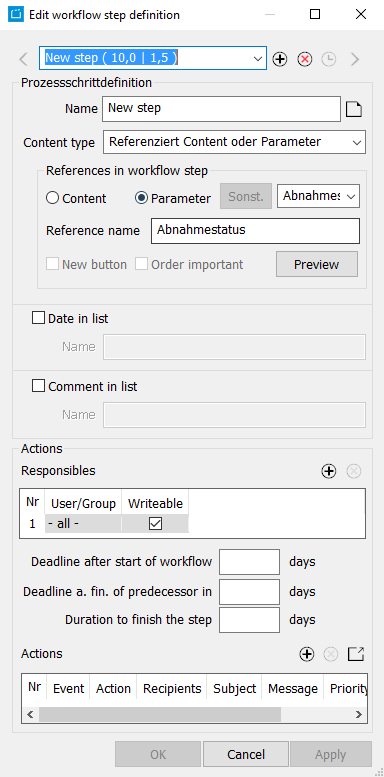
Notice:
This dialog serves to define the workflow step regarding its content. When the workflow will be launched later via the content, another dialog will open!
- Please enter a name for the workflow step.
You can enter a description by clicking on the button
 and entering a text. This can also be used if Text is used as reference type.
Please select the content type.
Depending on the content type you select, the workflow step will obtain some additional information to the content or further parameters such as company name, date (e. g. Deadline), texts etc. On selecting Referenziert nichts (does not reference anything) no further information will be effected.Content type Output Referenziert nichts (does not reference anything) = standard type

Output: deadline date + comment field
References a date Output: Standard type and additional date (label annex) References a text Output: Standard type and additional comment field (label annex) References text value list (Textwerteliste) Output: Standard type + Combo box which will be filled with present values References content or parameters Output: Standard type + Combo box which will be filled with content or parameters - Define the reference: define whether the current workflow step refers to a content or a parameter. In addition you can add a reference name.
- Preview: the button Preview shows the fields of individual workflow steps that will be displayed when the workflow is launched for some content.
Responsible persons/User administration: For each workflow step you can define reading and editing rights for persons and groups. Please select the field Responsible and add the required user/s. You can add further users/groups by inserting a new line.
Notice:
Default-presetting: In case no responsible users are defined, all users will have an editing right.
Duration of the workflow and deadlines: These can be defined in the next fields. The calculation results are in parts dependent on the selected link (required link, optional link or exclusive link, see Linking Workflow Steps and Status).
- Defining actions: Here you can link certain actions with the workflow step that are linked to an incident, for example sending a message or email on completing a step or exceeding a deadline. You can select between several incidents in the drop down list in the field Event. Define the action, the recipient and the subject of the message. Please use the buttons next to the field to insert or delete lines. Macros can be used in the fields subject, Message, Procedure call which have to be filled with reasonable values before launching the procedure.
Open the list of macros by selecting the button and copy and paste the required macro into the desired field.
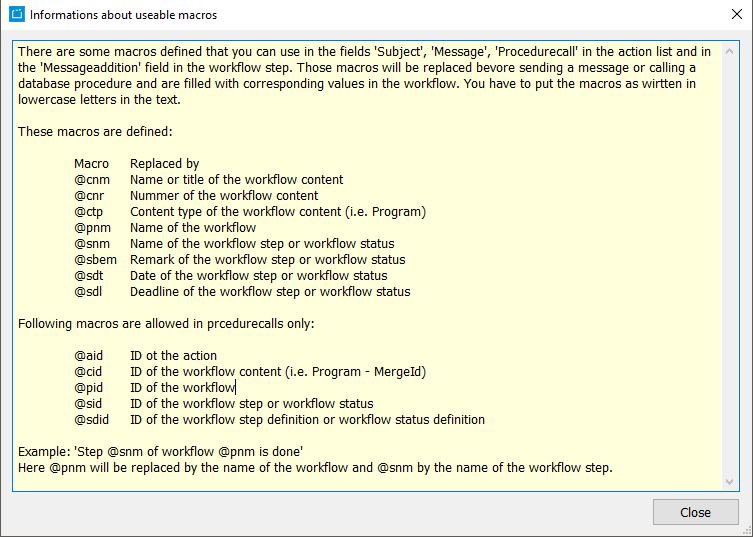
Calculation Logic of Duration and Deadlines
You can calculate the end and duration of any workflow, deadlines or the start date of individual steps. The calculation is based on workdays only!
Examples
Case | Start date | Step A | Step B | Step C | Results |
1 | May 05th | 5 | 5 | 5 | May 20th. |
2 | May 05th | May 09th | May 10th | After start: 10 days; | [After start = May 15th; after the predecessor May 05th] => May 13th |
3 | May 05th | May 10th | May 11th |
| May 11th |
4 | May 05th | May 17th | 5 |
| May 22nd |
Case 1: Calculation of the Workflow End
Proposition: The duration is defined per step in days
Anticipated result: the result depends on the addition of the duration of the default way and whether the fields deadline after start of workflow and deadline at finalization of predecessor.
- In case no default way was defined the system calculates all paths and indicates the maximum duration as valid value.
- The workflow end cannot be calculated in case the duration of one step has not been provided!
Case 2: Calculation of the Deadline for Step C in the Example Below
Proposition: The Workflow has a start date , and the predecessor has a finalization date; Step 3 has a number of days in the fields deadline after start of workflow and deadline after finalization of predecessor.
Anticipated result: If the fields deadline after start of workflow and deadline after finalization of predessesor are filled, then the result is calculated from the Min. date.
- In case the current step has several predecessors with required links the system will take the step of the predecessor with the maximum date.
Case 3 and 4: Aim: Calculation of the start date for step C
Proposition for case 3: There is a fix deadline date for step B
Proposition for case 4: There is a fix date for Step A and a duration for step B
Anticipated result:
- The deadline of the predecessor is the start date of the current step (case 3).
- If there is no deadline date of the predecessor, then the "deadline after finalization of pre-predecessor" will be taken and added to the duration of the predecessor (case 4).
Dialog Edit Status Definition
A workflow can contain several workflow steps whereby a status can also serve as starting point into another workflow. Reaching a workflow step may trigger the sending of an Email or another action within the database. The linked content of the workflow can be assigned to the respective status.
Double-click on the yellow workflow step in the workflow definition.
Please proceed as follows in the dialog Edit status definition:
- Select the desired status via the drop-Down list next to Status or enter a name of a new status. Is you enter a name, a new status is created. In addition you can enter a description to that new status by clicking on the button .
- Flag Date in list and flag Comment in list: These flags are active or inactive depending on the selected content type. On active flags you can also enter notations.
- Workflow duration and deadlines: calculation results are dependent on the selected link asset (required, optional or exclusive link).
- Defining actions: Here you can link certain actions with the workflow step that are linked to an incident, for example sending a message or email on completing a step or exceeding a deadline. You can select between several incidents in the drop down list in the field Event. Define the action, the recipient and the subject of the message. Please use the buttons next to the field to insert or delete lines. Macros can be used in the fields subject, Message, Procedure call which have to be filled with reasonable values before launching the procedure.
Open the list of macros by selecting the button and copy and paste the required macro into the desired field.
For receiving an email from a workflow step it is necessary that the following preconditions are fulfilled:
- the recipient has to be added to the list of users/groups in the user administration by the system
- the recipient has entered his email address in the ContentExplorer under Start > MyPage > Start > Edit employee data.
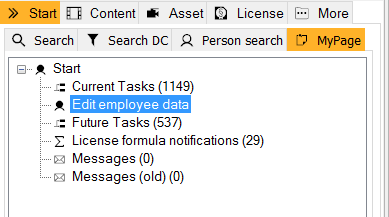
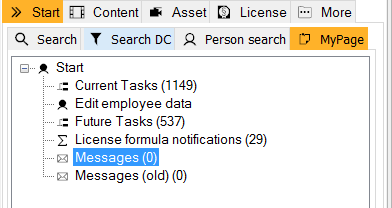
Messages can be viewed at the personal page (Start > MyPage > Start > Messages).
Linking Workflow Steps and Status
For linking the individual workflow steps and status steps you can chose from three types of links:
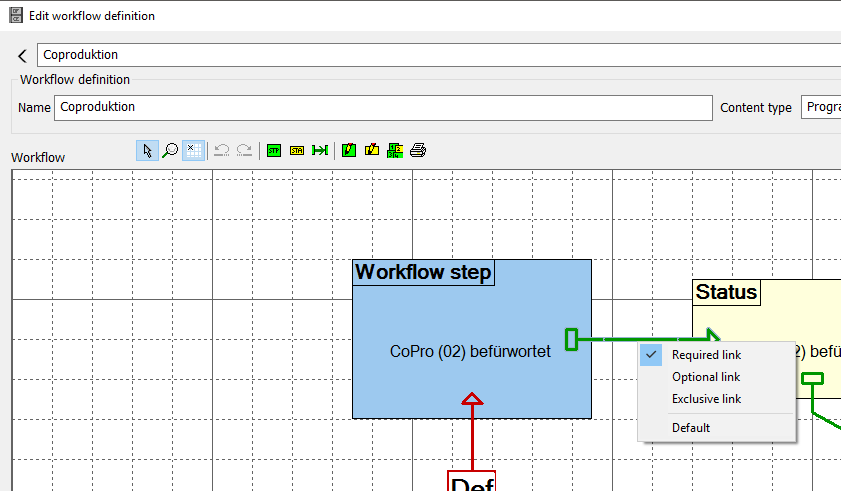
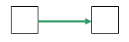
Required link (green): Here the predecessor has to be "finalized" before the next step can be carried out:
Optional link (orange):
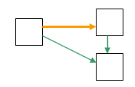
Exclusive link (red): This link is used, if there are several answers to a workflow step (e.g. Yes/No).

Notice:
There should be a main (or default) path; it is not possible to create ring paths. The predecessor or the link which points to a workflow step is always the crucial element for classifying a workflow step. Therefore:
- Two initial steps that have outwardly pointing exclusive links to a common successor do NOT present exclusive workflow steps as they do not have any incoming links pointing to them. Exclusive links only will have an exclusive effect if one step is linked to several exclusive successors linked, meaning that there is an initial step that links both workflow steps.
- As there are no default steps but only default links, several initial steps ALWAYS will be considered on calculating the workflow duration. Here, there should be an explicit link, too by using a default link to an initial workflow step. This would mean an individual start step with outpointing links.
- On displaying the task lists in the "Start" tab the link pointer on the respective step is also relevant. Here ONLY the optional link points to a step that will NOT appear in the task list. Steps that succeed such non-task steps will not appear in the list of future tasks.
Filing a Workflow
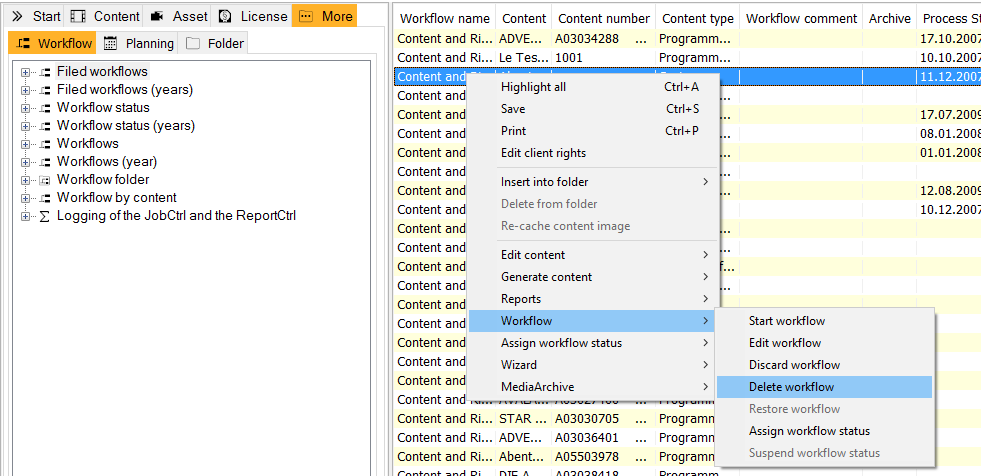
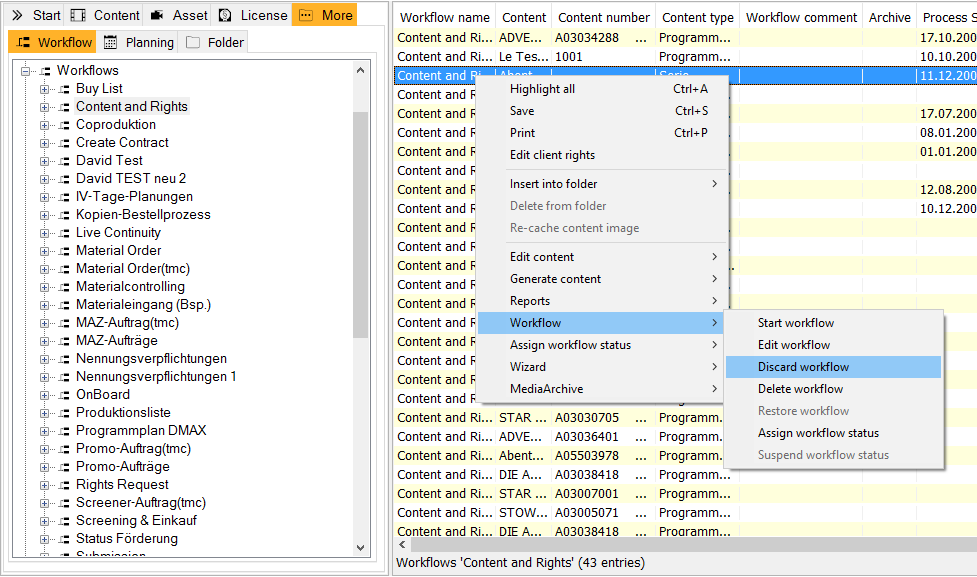
In case a workflow is not needed in the moment and should disappear from the workflow lists you can file it. Search for this process in the tab More > Workflow and select it in the result list. Please select the option Workflow > Discard workflow, see the following figure:
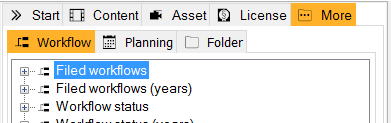
Finally the workflow is moved into the lists of filed workflows that can also be found in the tab More > Workflow:
Deleting a workflow
Notice:
Deleting a workflow never affects content, only the workflow itself will be deleted!
To delete a workflow please search for the respective workflow in the tab More > Workflow. Select the workflow with a right mouse-click and chose the option Workflow > Delete workflow: