2.2 Tab Planning
In this tab you can press the following buttons:
| Icon | Label | Description |
|---|---|---|
| Save | Saves the current slot template. |
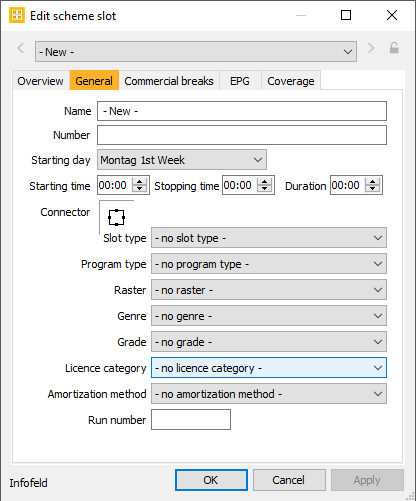
| New slot | Click this button, to create a new slot. Slots are edited in the dialog Edit scheme slot . The dialog serves to create and edit all data of a slot.
Afterwards you may edit the slot via the right mouse or move/enlarge/reduce the slot with the mouse. A double double-arrow appears at the edge of the slot.
|
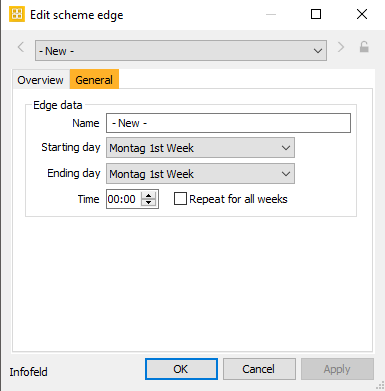
| New edge | To create a new edge please click this button. The dialog Edit scheme edge opens. Depending on your requirements, modify the name, start/end times etc. and click OK to save your changes.
|
| Edit slots | Slots can be edited anytime in the Scheme. Double-click on the respective slot in the slot scheduling window or select a slot and choose the option Edit slots in the header or in the context-menu of the right mouse. Slots are edited in the dialog Edit scheme slot .
The dialog serves to create and edit all data of a slot. |
| Delete slots | In order to delete a slot please select the slot and click the DEL-key or select the option Delete slots in the context-menu of the right mouse or in the header. The slot will be deleted. |
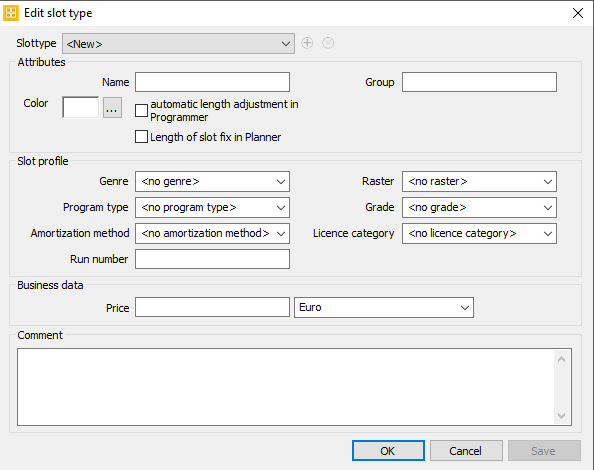
| Edit slot types | To edit an existing slot type, please select the respective slot in the slot scheduling window and choose the option Edit slot types in the header.
In this dialog you may change the name of the slot type, assign a group, define the slot color and the slot profile and determine the business data. |
| Highlight slot chain | Click this option in the context menu of the right mouse or in the header after selecting a slot. The entire slot chain will be highlighted so you can recognize missing connectors or connector errors, move or delete the entire chain. |
| Select slots of slot types | Select the desired slot in the slot template and click the button Select slots of slot types in the slot type bar. Now all slots (sequels slots and repeat slots) of the selected slot type are highlighted by a black frame. You may now assign another slot type to the highlighted slots. |
| Slot action | Shows the action menu. All functions are described in the next five entries. |
| Move slot to next object | This option moves the selected slot to the next slot (or object) without leaving a gap. |
| Move slot to previous object | This option moves the selected slot upwards to the previous object/slot without leaving a gap. |
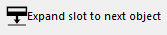
| Expand slot to next object | This option enlarges the selected slot in such a way that it reaches from its original position until the next slot without leaving a gap. |
| Expand slot to previous object | This option expands the selected slot in such a way that it is extended upwards to the previous slot while keeping its end time. |
| Spread slot between objects | This option enlarges the selected slot in such a way that it is expanded upwards AND downwards to the start/end positions of the previous and next objects without leaving a gap. |
| Slot type | Click into this field to open the drop down list of all existing slot types. Select the slot type you need. On creating a new slot the selected type will be taken over into the slot. For changing the slot type of an existing slot in your slot template please select the slot and choose the respective slot type via the drop down list. The selection of a certain slot type can be important on defining and applying the ad break model. Notice: On assigning the slot type to a slot all default values of the slot type which are not NULL are transferred to the slot - a message informs on overwriting the values. By affirming the second message you can take over these parameters to all existing sequel and repeat slots! In case the required slot type has not been created yet, you may do this with the next button Edit slot type. |
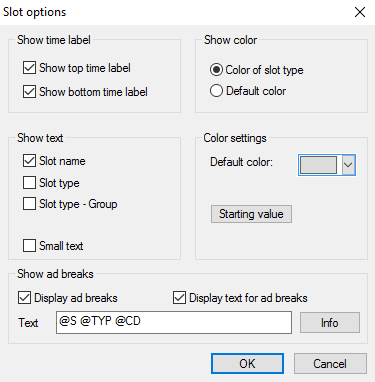
| Slot options | Opens the dialog Slot options .
|
| Edit edges | This function will only be activated after selecting an existing edge in your program scheme. You may either double-click on the edge or open the dialog Edit scheme edge in the header or in the context-menu of the right mouse. Depending on your requirements, modify the name, start/end times etc. and click OK to save your changes.
|
| Delete edges | Select the edge you want to delete and press this button or choose the option in the right-click menu. You can also delete an edge by selecting the edge and pressing the key [DEL]. |
| Delete connectors | All existing connectors - repeat and sequel connectors - can be deleted anytime. Please select the respective connector with the mouse (thus highlighting the connection) and either press the key [DEL] or click the option Delete connectors in the header or in the right mouse menu. The connector will be deleted. |
| Selection mode | The selection mode is the default mode. With the mouse mode you can select and drag and drop all elements of the scheme plan (like slots and connectors). |
| Zoom mode | Select the zoom mode to enlarge or reduce the view of the window and to zoom into a desired area of the program plan. A right-click in this mode enlarges the view, a left-click in this mode zooms out. After using the zoom you need to change back into the select mode (press [ESC] for reaching the default mode). Notice: In addition to the zoom mode you can also use the zoom controls for hours and days in the dimensions bar (2.4 Tab View). |
| Slot mode | Set your mouse pointer at the position in the scheme plan at which the slot should be located. A black bar appears which you can position within the plan. Click and hold the mouse button to pull it up or down to the desired length. At a maximum zoom you can also draw slots minute-precisely. After drawing a slot you need to change back into the select mode (press [ESC] for reaching the default mode). You may edit the slot with the right mouse or move/enlarge/reduce the slot with the mouse. A double double-arrow appears at the edge of the slot:
It is possible to create slot strings automatically. See the following chapter for more information: 1.3 General Functions |
| Edge mode | If you need to draw an edge (e. g. a prime time edge) within your program plan, activate this button in the header or in the context menu of the right mouse and draw the edge by clicking and holding the mouse to the position and length you need (from right to left). After drawing an edge you need to return into the mouse mode (press [ESC] for reaching the default mode). You may edit the edge with the right mouse. |
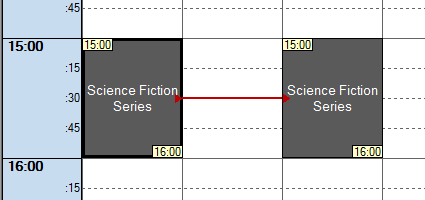
| Sequence mode | This button serves to create slot strings which are linked as a sequel: Activate this mode and drag the red arrow from the source slot to the desired slot (instead of the mouse pointer a small cross is displayed).
Notice: It makes sense to link slots by sequel and repeat connectors above all for series channels. Here, on scheduling an episode version into the source slot all sequels and reruns are stripped into the program plan automatically by a series planning wizard. |
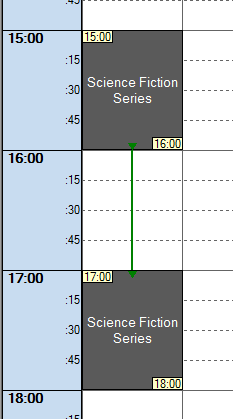
| Repeat mode | This button also serves to create slot strings: If you want to link two or more slots by a repeat connector please activate this mode and drag the green arrow from the source slot to the desired rerun slot (instead of the mouse pointer a small cross is displayed).
Notice: It makes sense to link slots by sequel and repeat connectors above all for series channels. Here, on scheduling an episode version into the source slot all sequels and reruns are stripped into the program plan automatically by a series planning wizard. |