1.3.4 Scheduling of Series
For an automatic scheduling of series, it makes sense to prepare a reusable program template in the Template Scheduling application Scheme.
Notice:
The automatic scheduling of series only works, if at least one program version is marked as a Schedule version. In order to do this, please open the ContentExplorer, open Admin > Edit parameter > Version type and set a flag in the column Schedule version.
The scheduling of series in the Programmer can be carried out automatically as follows:
Automatic Series Scheduling
Open the scheduling window in the Programmer with the required service and the start date for the required number of days (e. g. 14 days) (1.3 General Functions).

Now you may load a program template into the empty program by clicking Program schedule > Load scheme schedule (2.3 Tab Program Schedule).
The template (scheme) will be displayed within your plan.
Notice:
After completing a series for one week, you may load a scheme template for the following week and connect the associated slots at the slot scheme borders manually with repeat or sequel connectors. Click Continue series in the context menu of the right mouse after selecting the first slot. The series episodes will be scheduled into the connected slots.
Select the desired series episode version or program version form the lists of the data sources into the slots of the scheduling window by dragging it with the mouse into the source slot in the Programmer (the 1st slot of a slot string).
Provided that this start slot has repeat connectors (green arrow connections) and/or sequel connectors (red arrow connections), you may select the episodes to be applied in the series episode wizard:
Series Episode Wizard
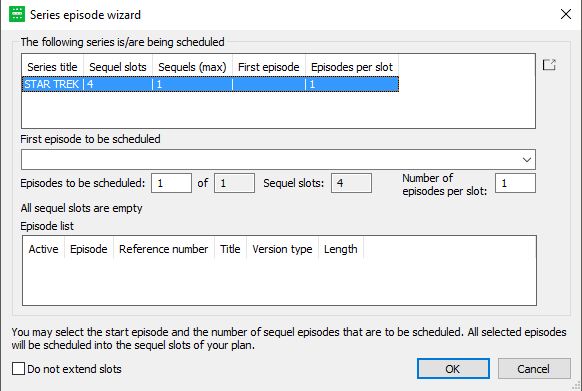
This dialog offers the following options:
- Section The following series is/are being scheduled: shows the number of sequel slots, the first episode to be applied and the number of episodes per slot for the selected series. Click the button
 to open the series dialog. You may change this selection in the lower sections of the dialog.
 - First episode to be scheduled: Select the fist required episode which is to be scheduled in the drop-down menu. If the selected entry is a folder or a serial, all program versions will be listed here.
- Episodes to be scheduled: This field shows the number of the episodes that can be scheduled automatically due to the connected slots in your plan. To receive more information on the episodes, click the button to open the series dialog.
- Number of episodes per slot: Usually only one episode is scheduled per slot (default setting). You may also change the number, e. g. for a double feature series etc.
- Episode list: The wizard lists all episodes that will be scheduled by an activated flag. Depending on the scheduling succession priority the wizard activates different episodes. You may change the scheduling succession manually by setting/unsetting this flag:
Priority of version types on the scheduling of series: The wizard offers specific versions due to the definition of a succession priority for the channel. This definition is done in the ContentExplorer in the parameters (Admin > Edit parameter > Channel, field Priority of version types for the series scheduling). E.g: Priority: S,O ==> Synchronous versions are scheduled at highest priority, followed by original versions. If the priority of version types has not been defined, the default-setting is P,S,O: program versions are scheduled at highest priority, followed by synchronous versions, than original versions. The episode list of the series episode wizard offers the episode versions according to the selected priority by pre-activated flags. You may change this setting. - Do not extend slots: In order to avoid collisions during series scheduling, it makes sense to activate this flag. With a deactivated flag and a long episode, the slots in your plan will be adapted to the length of the episodes and the succeeding slots will be moved downwards.
If required you may modify the pre-activated episodes (Flag Active), the first episode to be scheduled or the number of episodes to be scheduled.
Click OK to start the auto-scheduling process.
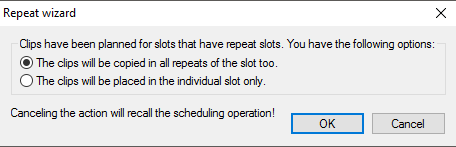
Due to the settings in the series episode wizard the sequel slots (and/or repeat slots) will be scheduled. The repeat wizard provides you with the following two options:
- You can place one series after another in the plan. At any time, you can edit individual episodes, delete episodes in slots and continue a series.
Edit Episodes
You can edit individual episode versions of the series in the ContentExplorer (dialog Edit series), for example in order to change the episodes‘ order, add an additional episode, etc.
- Select the series, right-click and chose the option Show series.
- Open the tab Episodes.
→ This dialog shows all episodes of the series. You have various editing options, see 3.3.2 Tab Episodes.
Continue Series
Usually, at the transition of a monthly or weekly program schedule to the subsequent schedule the individual slot strings from the first slot template to the next are not connected. Here it is necessary to manually link the sequel slots and repeat slots by setting the respective connectors. Following that action you may continue the automatic scheduling of the series.
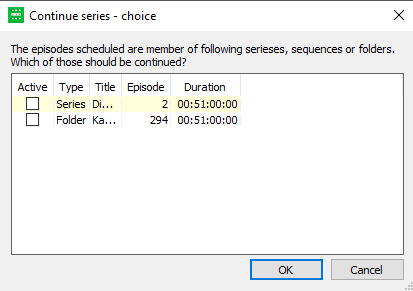
The same is true in case that already scheduled episodes were deleted and the slot string is now incomplete. You may continue the series automatically, see figure above. This function can be carried out for series, sequels and folders.
Select the first empty slot of the slot chain, right-click to open the menu and chose the option Continue series. This opens the series episode wizard in which you can select the episode with which the continued series should start. Then click OK. The following dialog opens:
Select a series or folder, which episodes are supposed to be in the following slots. Click OK.
Series Scheduling for Long-Term Scheduling by Schedule Sections
If a slot chain continues over several weeks or months, long-term scheduling of this series can be done by using schedule sections. With regard to this, the Programmer enables you to define schedule sections for the long-term scheduling. Defining a schedule extract enables you to open certain days (e.g. Monday) and time ranges (e.g. 8 pm to 10 pm) for a certain channel for a maximum of 90 days starting from the current date. This way, you can check and complete the series scheduling in slot chains while your „normal“ schedule is open (1.3.1 Edit Schedule Sections).
Once this schedule section has been defined, it will be shown next to the current schedule grid in a tab of its own. You can perform the series scheduling as usual.
Advertisements in Series Scheduling
After the slots have been filled with events by automatic series scheduling (and manual editing, if necessary), you can schedule ad breaks. There are several options:
- Activate commercial scheduling of slots to events (copy all ad breaks of the slots from the program templates to all scheduled events)
- Apply ad break model (apply an existing ad break model to events according to event length and time ranges/days)
- Insert ad break (manually)
Release Schedule
As soon as you have finished the schedule, included advertising and fixed all errors, you can release the schedule with editorial approval and/or press approval. Click on Wizards > Release schedule to open the program schedule approval wizard (2.6 Tab Wizards).