2.3 Tab Program Schedule
The tab Program Scheme serves to load a slot template from the Scheme application and to edit elements of the slot scheduling such as slots, slot types and edges.
Notice:
In the Scheme application a slot template is created for successive days without any reference to a calendar date. It is created with slots, edges and slot strings with connectors. Such a template serves to schedule series and commercials. A template schedule has a distinct name and is edited independently of any service/channel. It also allows to use an ad price schedule in the Programmer.
Before loading a template schedule into the Programmer please make sure that you opened the required program plan (by selecting the channel, start date and number of days) and that this plan is empty. Now you may load the desired template schedule into the program plan.
Buttons
| Icon | Label | Description |
|---|---|---|
| Save | Saves the current slot template. |
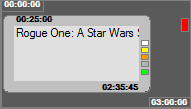
| New slot | You can create new slots manually in your program plan independently of any loaded slot template. Click this button, to create a new slot. Slots are edited in the dialog Edit scheme slot. The dialog serves to create and edit all data of a slot. |
| New edge | To create a new edge please click this button. The dialog Edit scheme edge opens. Depending on your requirements, modify the name, start/end times etc. and click OK to save your changes. |
| Edit slots | Slots can be edited anytime in the Scheme. Double-click on the respective slot in the slot scheduling window or select a slot and choose the option Edit slots in the header or in the context-menu of the right mouse. Slots are edited in the dialog Edit scheme slot. The dialog serves to create and edit all data of a slot. |
| Edit slot types | To edit an existing slot type, please select the respective slot in the slot scheduling window and choose the option Edit slot types in the header. In this dialog you may change the name of the slot type, assign a group, define the slot color and the slot profile and determine the business data. |
| Slot price scheme | Opens the slot price scheme menu, which is described in the following two entries. |
| Apply | Notice: Before a slot price model can be applied on the slots in your program plan, you need to define a slot price model first! By applying a slot price model on the slots of the currently loaded program plan the slot prices are entered. The slot prices are used for a forecast scheduling. To automatically enter the prices for slots, please proceed as follows:
| |
| Edit | Opens the dialog Edit slot price model. | |
| Edit edges | This function will only be activated after selecting an existing edge in your program scheme. You may either double-click on the edge or open the dialog Edit scheme edge in the header or in the context-menu of the right mouse. Depending on your requirements, modify the name, start/end times etc. and click OK to save your changes. |
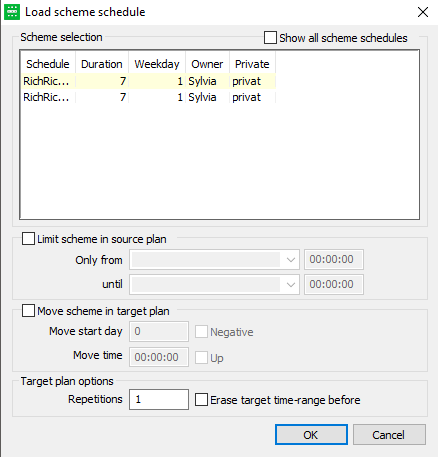
| Load scheme schedule | Before loading a slot template into the Programmer please make sure that you opened the required program plan (via selecting the channel, date and number of days). The program schedule needs to be empty; then click on the button Load slot template. The following dialog opens:
|
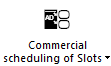
| Commercial scheduling of slots | Opens the commercial scheduling menu, which is described in the following two entries. |
| Activate commercial scheduling of slots | Notice: This function can be utilized only if a slot template has been loaded into the Programmer which contains ad breaks or if you inserted slots with ad breaks manually into the program schedule. All slots in the current plan will hand over their ad breaks to the scheduled events! By activating this function all „free“ ad breaks in the program schedule will be transferred to the scheduled events thus binding them to the events. To carry out this function, please save your program schedule and select this button. All scheduled events in the program plan will inherit the ad breaks from the slots behind. Before:
After:
Notice: In case that some ad breaks were already lying within events BEFORE activating this function, they will not be overwritten or deleted but the new ad breaks from the slots will be added to the already existing ones. |
| Return commercial scheduling of events to slots | With this function, you can undo the changes of the button Activate commercial scheduling of slots. The commercial breaks of the selected slots will be moved back to the slots. |
| Ad break model | Opens the ad break model menu, which is described in the following two entries. |
| Apply | Opens the dialog Apply ad break model. |
| Edit | Opens the dialog Edit ad break model. |
| Ad break time model | Opens the ad break time model menu, which is described in the following two entries. |
| Apply | Opens the dialog Apply ad break time model. |
| Edit | Opens the dialog Edit ad break time model. |
| Apply ad break time model - fix all ad breaks | This opens a dialog with which you can fix all ad breaks. See 4.6 Dialog Apply Ad Break Time Model. |
| Ad break price schedule | Opens the ad break price schedule menu, which is described in the following two entries. |
| Activate | Opens the dialog Select ad price schedule. |
| Edit | Opens the dialog Edit ad price schedule. |
| Ad break index number | Opens the ad break index number menu, which is described in the following three entries. |
| Assign new index numbers to all ad breaks | See 2.1 Assign Ad Break Index Numbers. |
| Assign missing index numbers | Just like the button Assign new index numbers to all ad breaks. But please select this button, if you have added ad breaks additionally. In this case the index numbers will be generated only for the new ad breaks. |
| Check ad break index numbers for duplicates | At each coding process it makes sense to check the slot template for duplicates. A duplicate is generated if there are two identical combinations of the coding positions 1 & 2, 3 & 4 and 7 & 8 within one GFK day (03.00 to 03.00). Example: 01 14 12 01 and 01 14 17 01 = Duplicate coding Select the option Check ad break index numbers for duplicates in the header. |
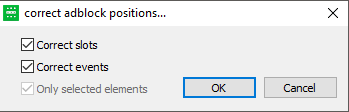
| Correct ad break positions | It is possible to amend slots and events manually by dragging the line that marks the begin or the end of the element to match the desired time within the plan. In this case, the ad break positions do not change; however, the system automatically corrects the ad break positions if you activate this button. You can choose whether you would like to correct slots, events or both. If you have highlighted several elements, you also have the option to correct only the highlighted elements.
|
| Correct event length | Length errors are displayed in the Programmer with the precondition that you set the color for displaying length errors in the tab Event Coloring of the Programmer Options. Here you may set a color (red for errors) in the parameter Depending on event error. Now all events with a wrong length are presented in this color. On opening the event dialog you may also see length errors in the Status field. The option Correct event length can be used in the following cases:
|
| Flags | You can set various flags for the selected event/s with this button. Flags can also be activated or deactivated via the event dialog. Notice: Flags can be displayed and edited
All flags set in the program plan can be highlighted with the button Eventcolor by flags in the tab Coloring. See also: Flag Press, Flag Live, Flag Logo und Flag Compacting Fix. |
| Show scheduling status | For every event in the Programmer, you can see the scheduling status. In order to do this, please select an event and click this button or the option Show scheduling status in the the context menu of the right mouse. The Programmer shows the scheduling status of the event in the tab Scheduling status of the data sources. |